Media Wall Transformation The Ultimate Home Theater Upgrade
This is a real build diary from our latest project. We created a very large Media Wall with integrated lighting, audio, smart controls, a motorized screen, and a raised seating platform. Below you’ll find the full plan, specialist commentary, and an easy-to-scan table that looks great on mobile and desktop.
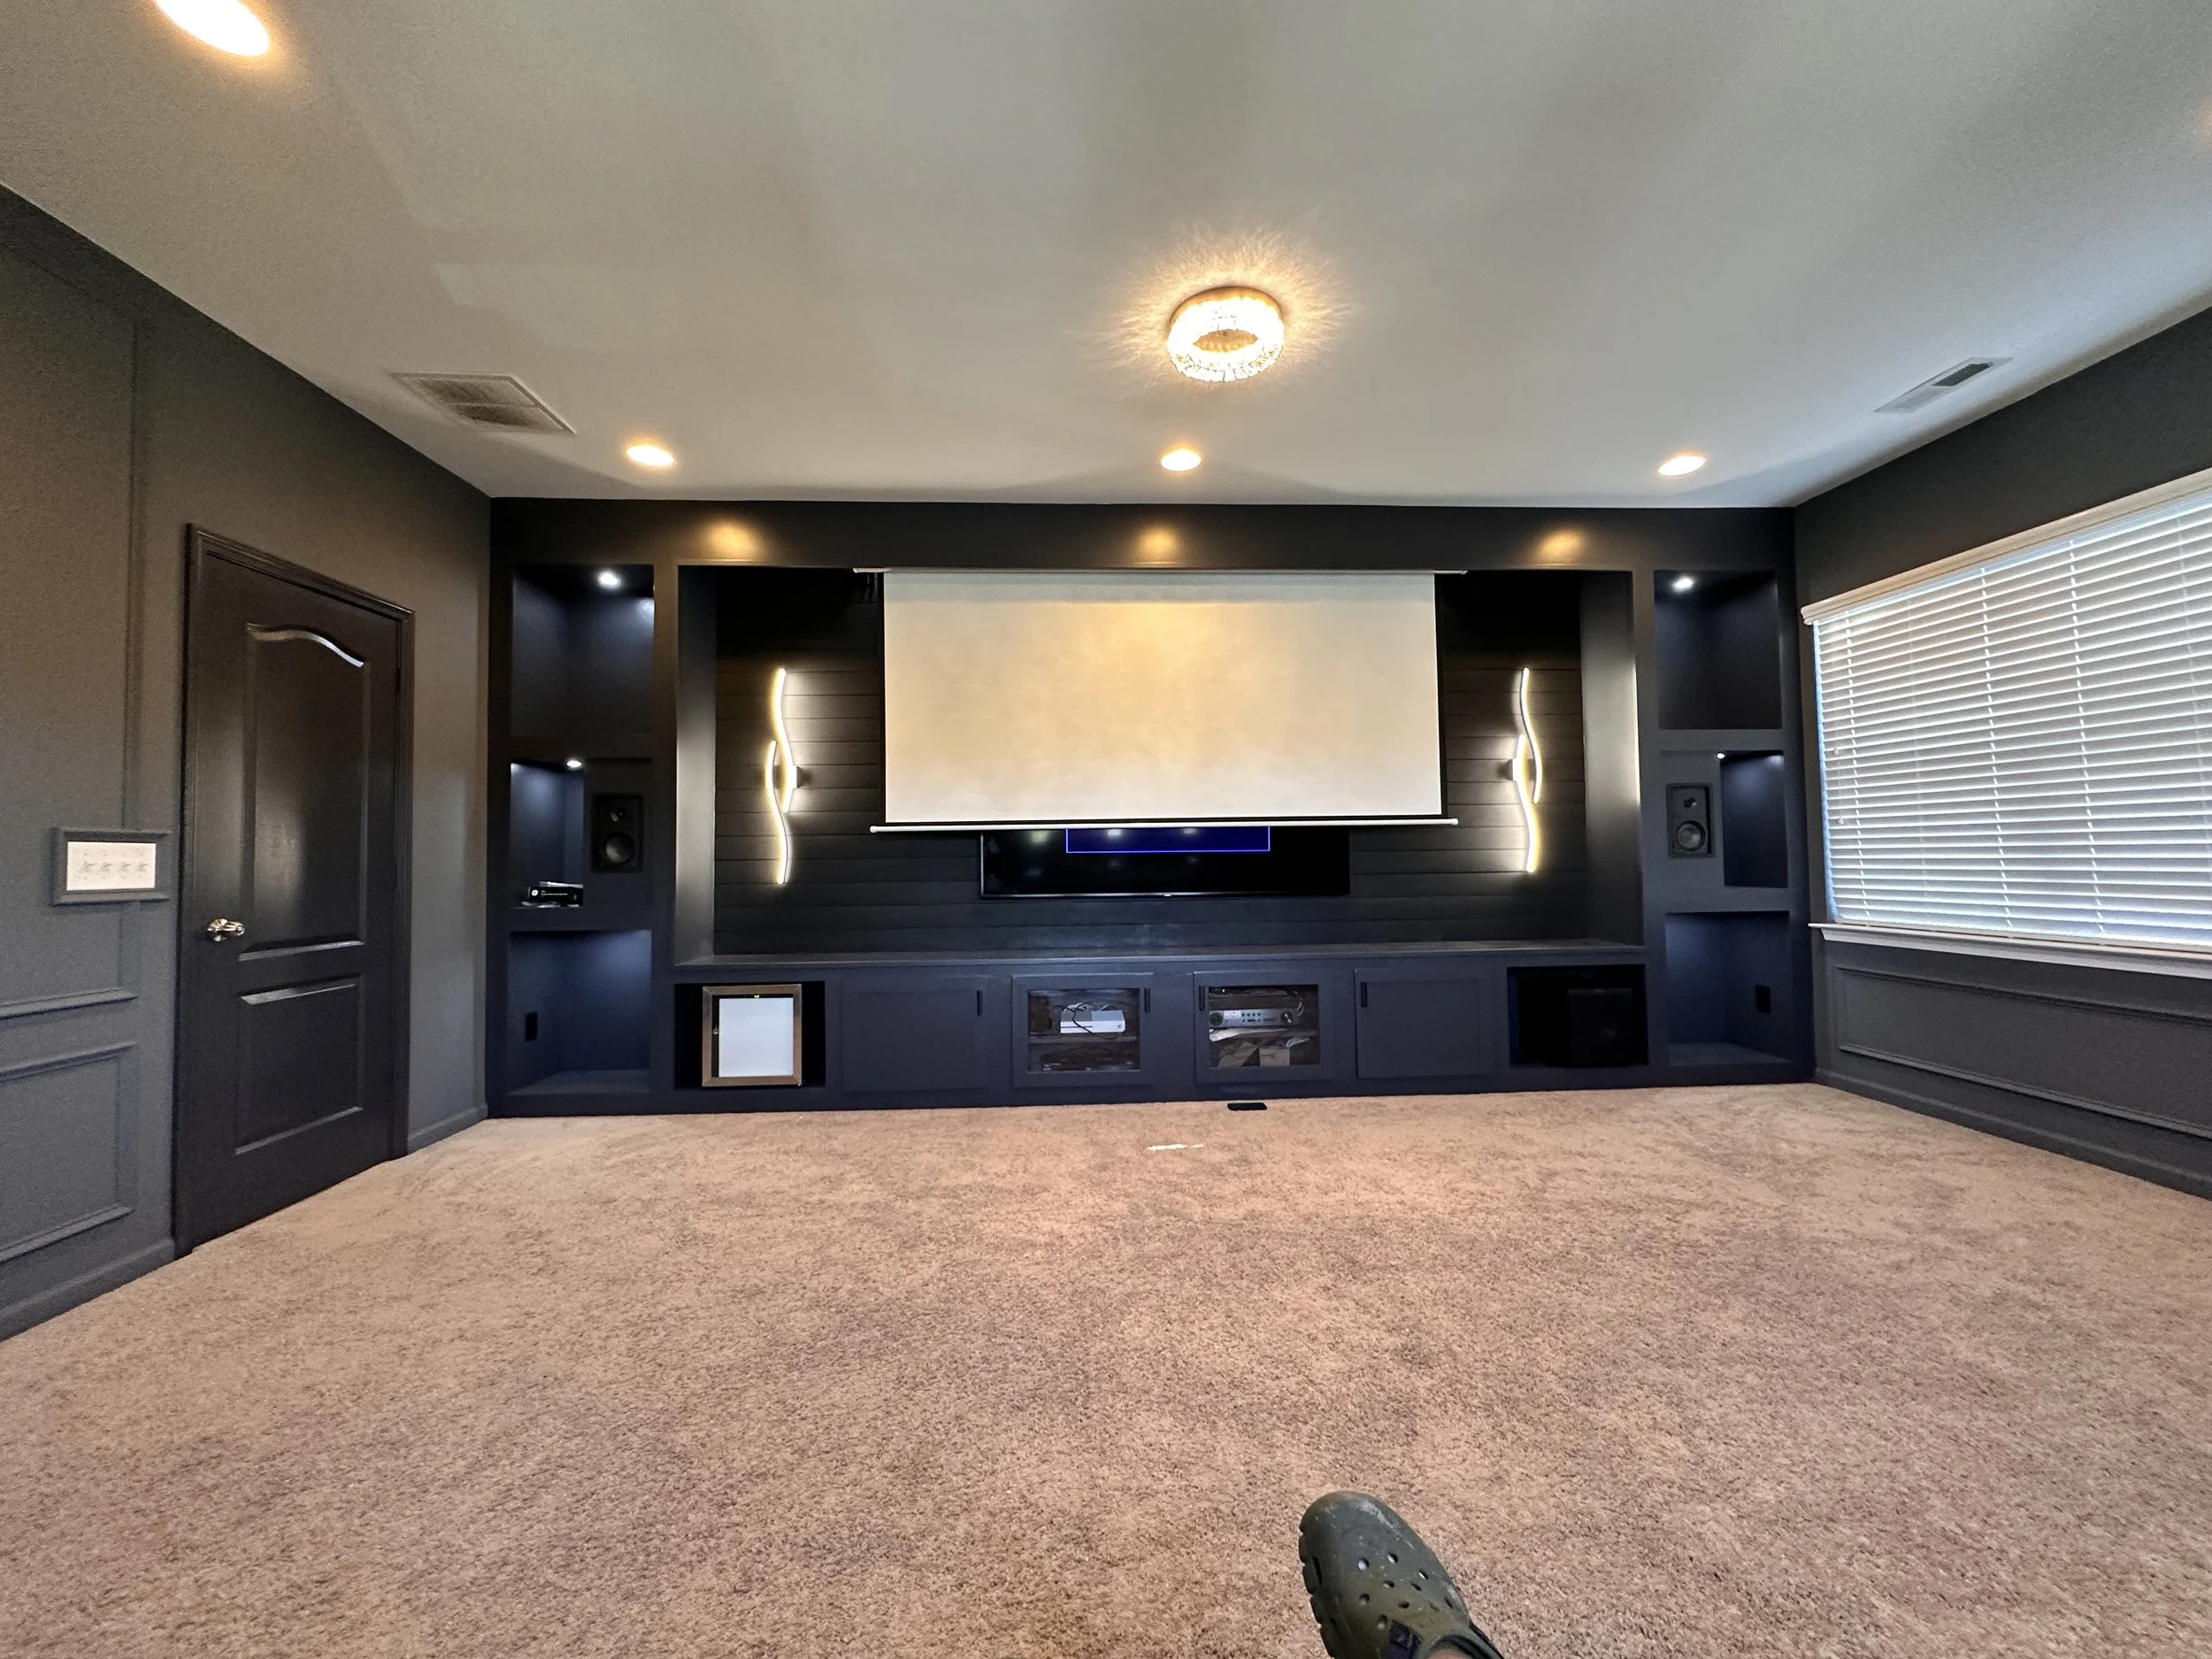
Project Overview: What We Built and Why It Works
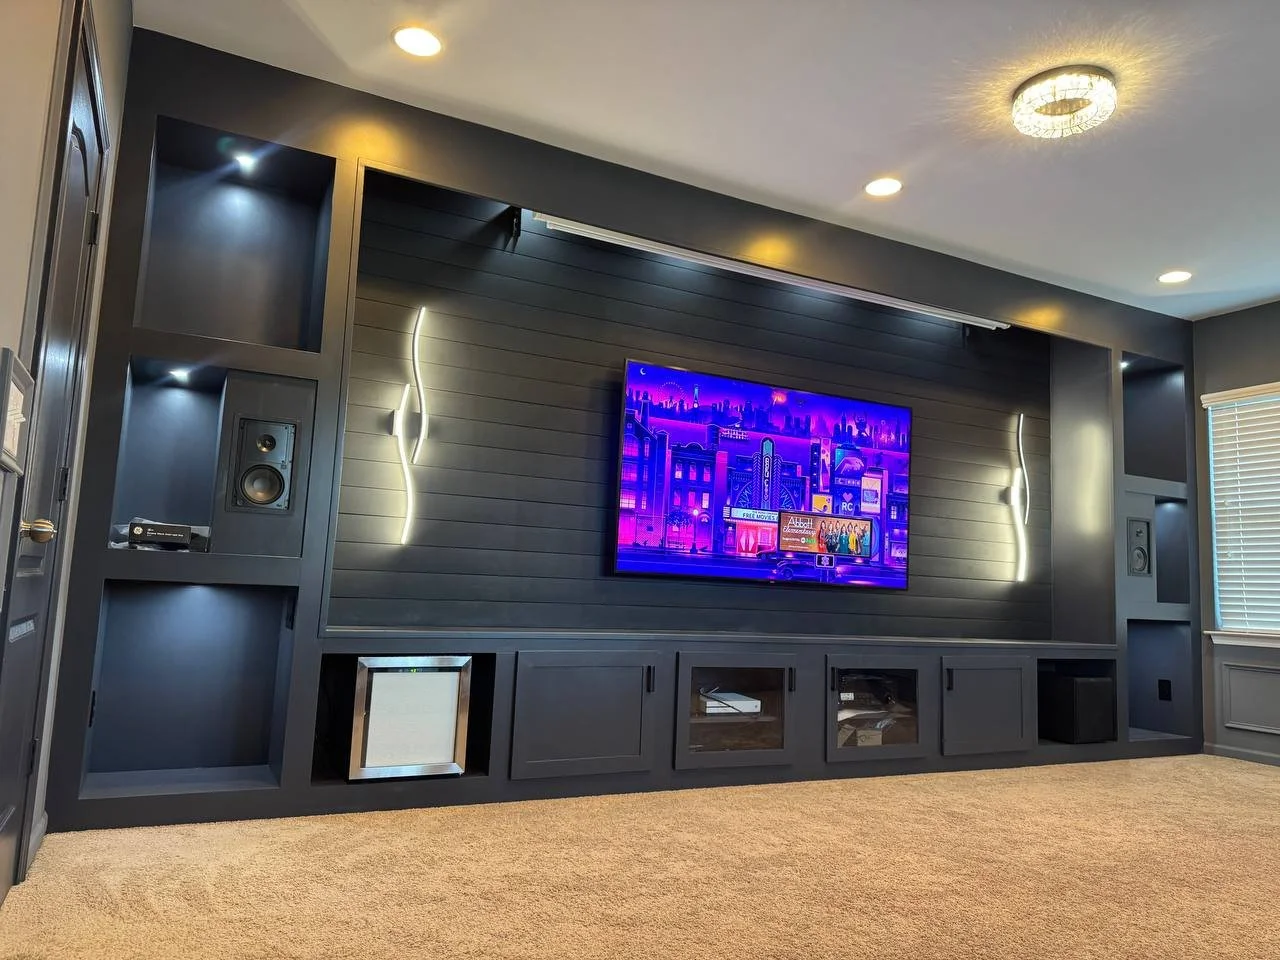
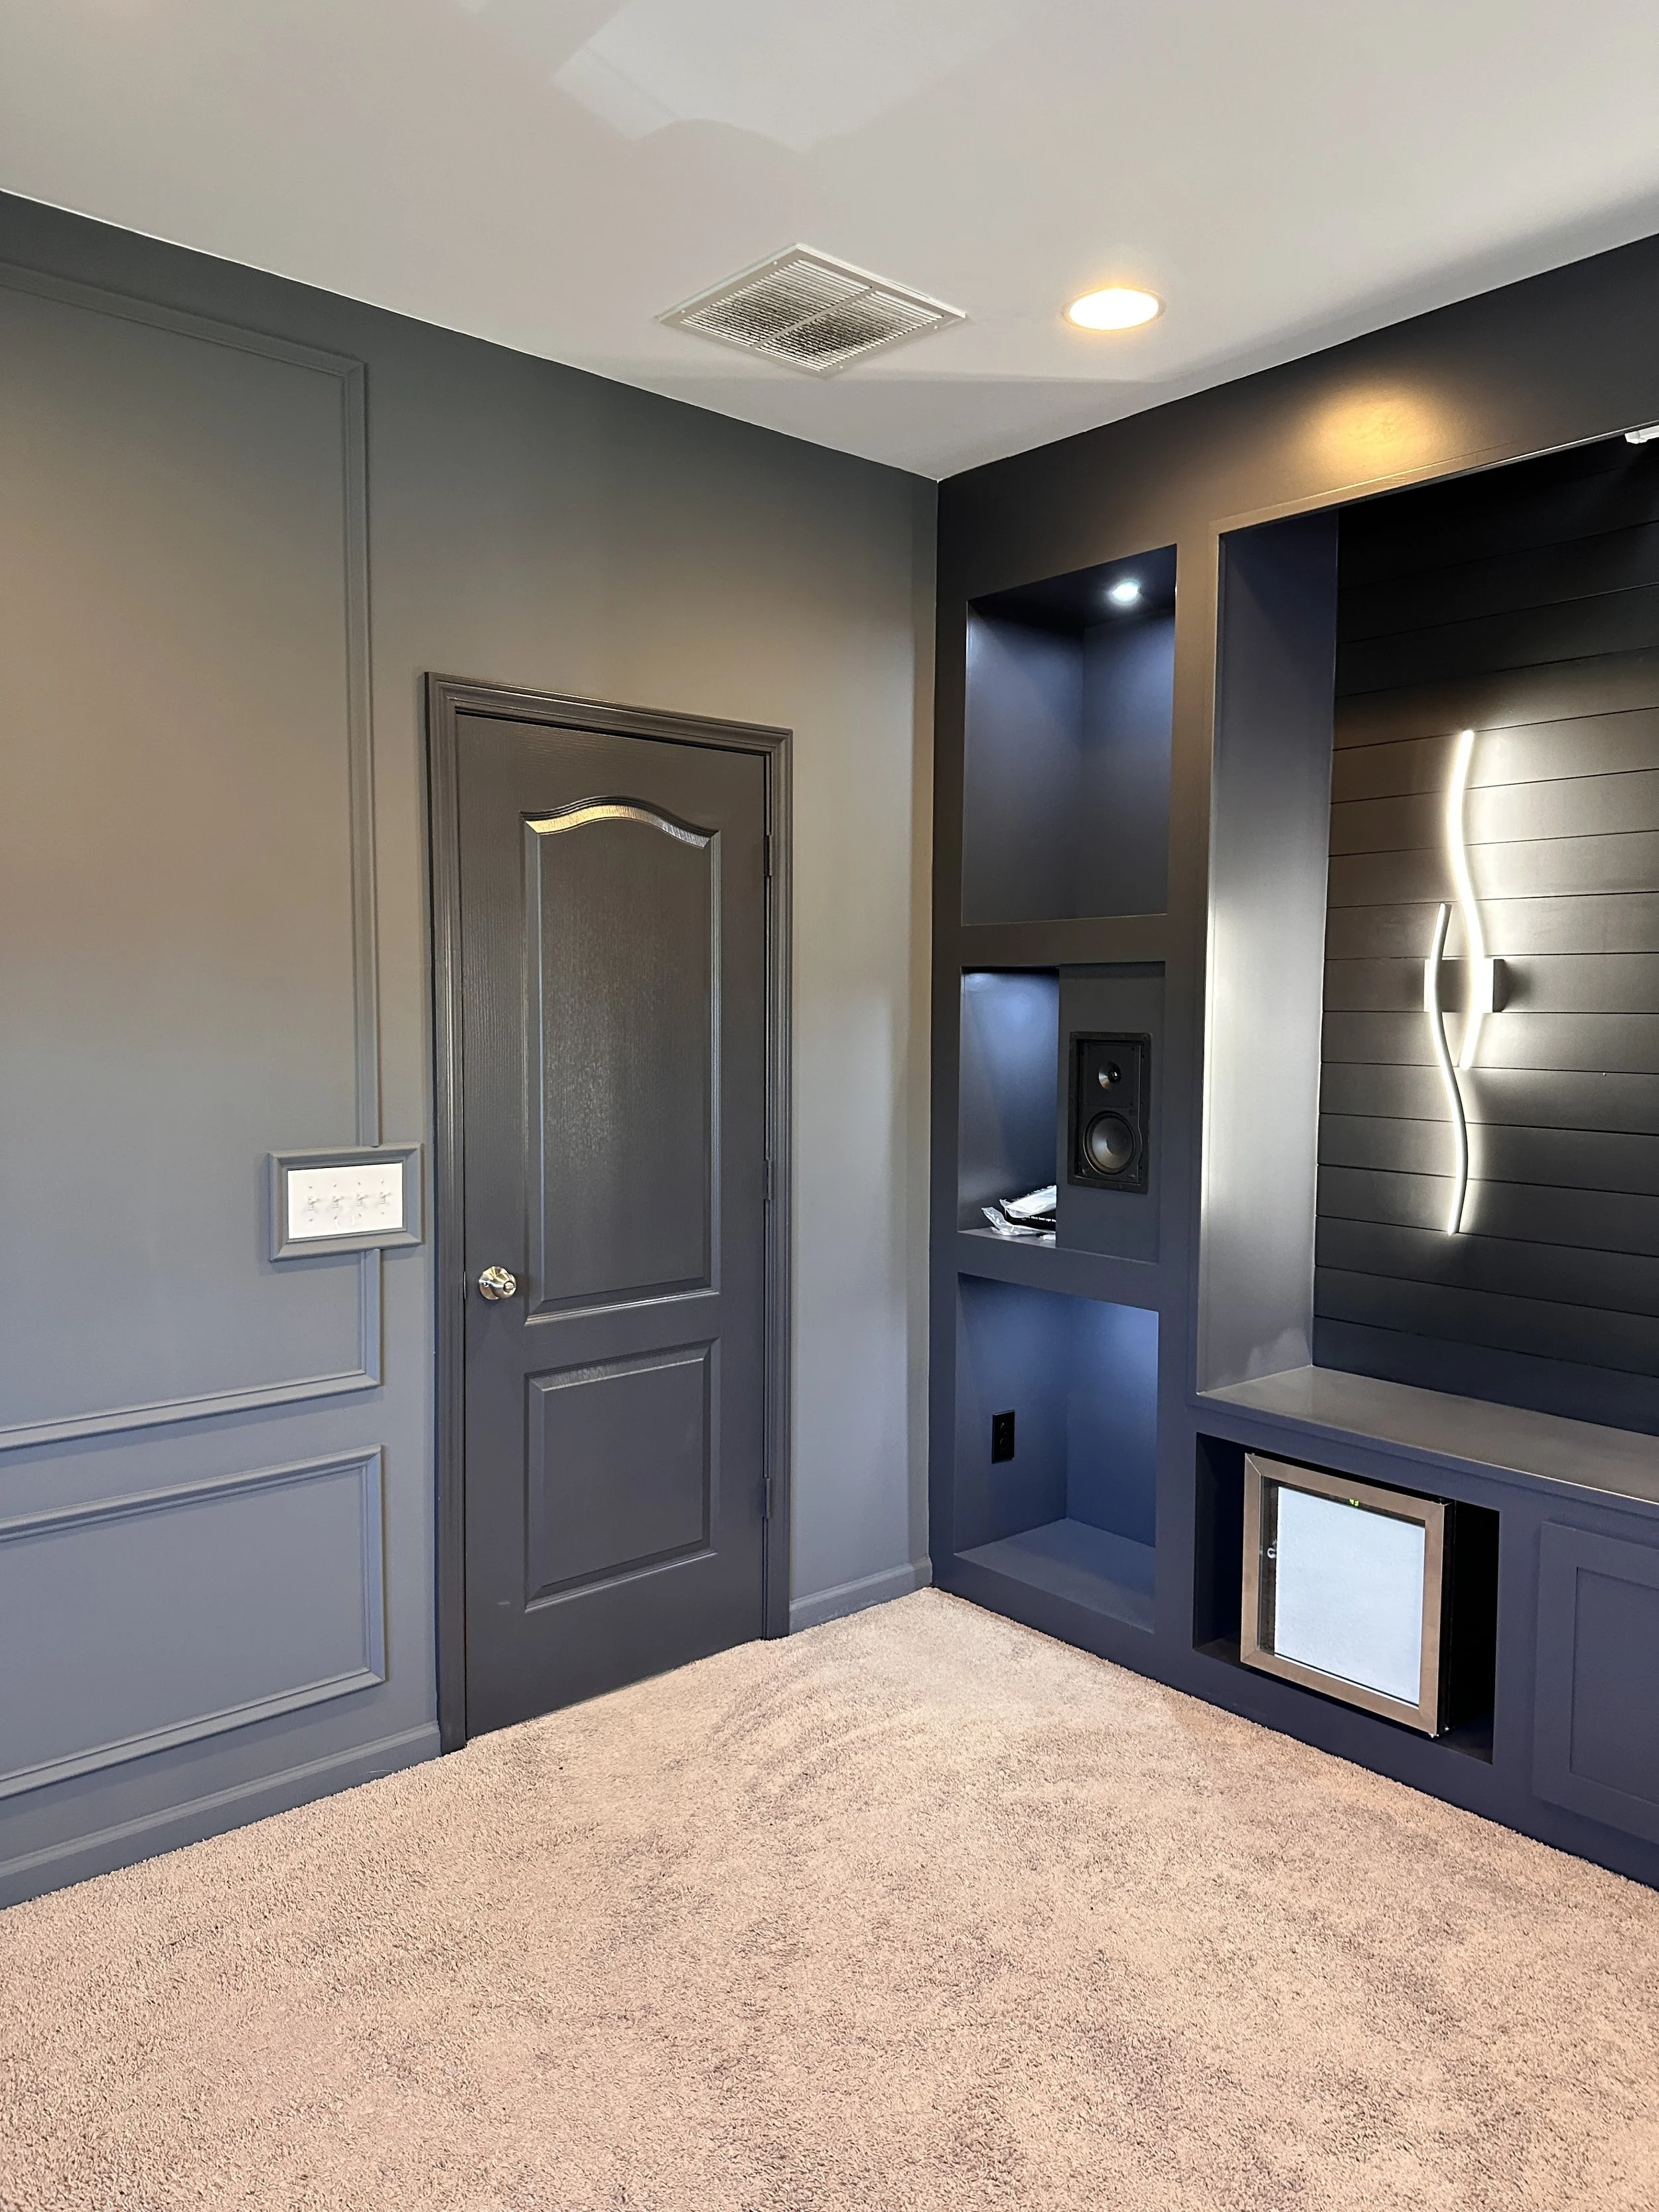
We started with a bright bonus room and turned it into a purpose-built home cinema anchored by a massive Media Wall. The wall spans the front of the room and balances technology with tailored millwork. We added Wi-Fi controlled RGB LED+ lighting (including bias light behind the TV), curved LED sconces, and recessed downlights for layered illumination. A motorized projection screen drops in front of the TV at the press of a button, while a ceiling-mounted projector lines up perfectly with the screen. We installed in-wall speakers, subwoofer bays, clean equipment storage behind glass doors, and a neat wiring backbone. We also gifted a fresh repaint with elegant wall trim, built a two-row seating platform (riser) wrapped in carpet, updated ceiling fixtures, and tuned the whole system for comfort, impact, and long-term reliability.
Specialist’s comment: The single biggest win in rooms like this is planning the light paths and reflections first. Everything else—speakers, screen, even paint—works better afterward.
Design Language: Clean, Symmetrical, Cinematic
The look is modern and calm: straight lines, generous negative space, and a hero center bay for the display. Vertical alcoves on each side keep the composition symmetrical. Curved LED sconces add movement to the shiplap backdrop without clutter. We intentionally limited our palette to deep neutrals to make the imagery on-screen pop and to reduce light bounce.
Shiplap color: Graphite “total black” for a low-gloss, reflection-taming surface.
Cabinet color: Sherwin-Williams Deep Blue for depth and subtle contrast against the Graphite wall.
Hardware & glass: Dark, low-sheen finishes so gear disappears when lights dim.
Specialist’s comment: Darker finishes near the screen maintain perceived contrast and reduce eye fatigue in long movies or gaming sessions.
Space Planning: Sightlines, Throw Distance, and Access
Before cutting wood, we mapped:
Sightlines from both seating rows to ensure no heads block the center of the picture.
Throw distance and lens shift for the projector so the motorized screen fills the frame without keystone distortion.
Screen drop path to clear the TV, soundstage, and LED sconces.
Circulation around the door and window wall.
Service hatches for cable pulls and component swaps.
Quick rule: If a motorized screen drops in front of a TV, leave a minimum of 3–4 in (75–100 mm) between the TV face and the screen path, plus side buffers for the housing.
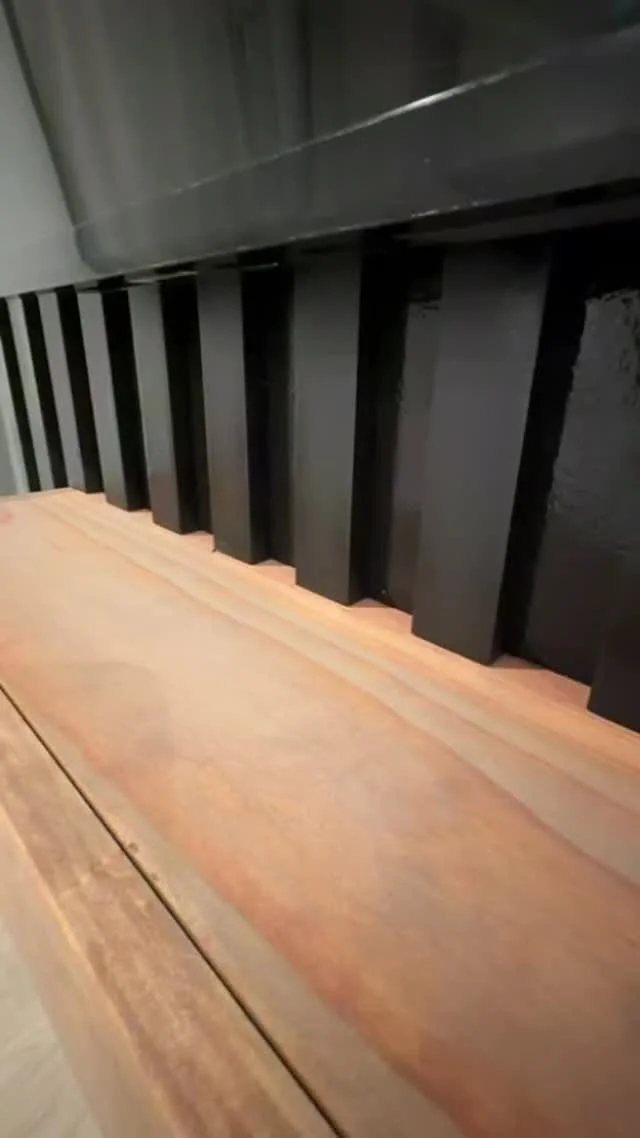
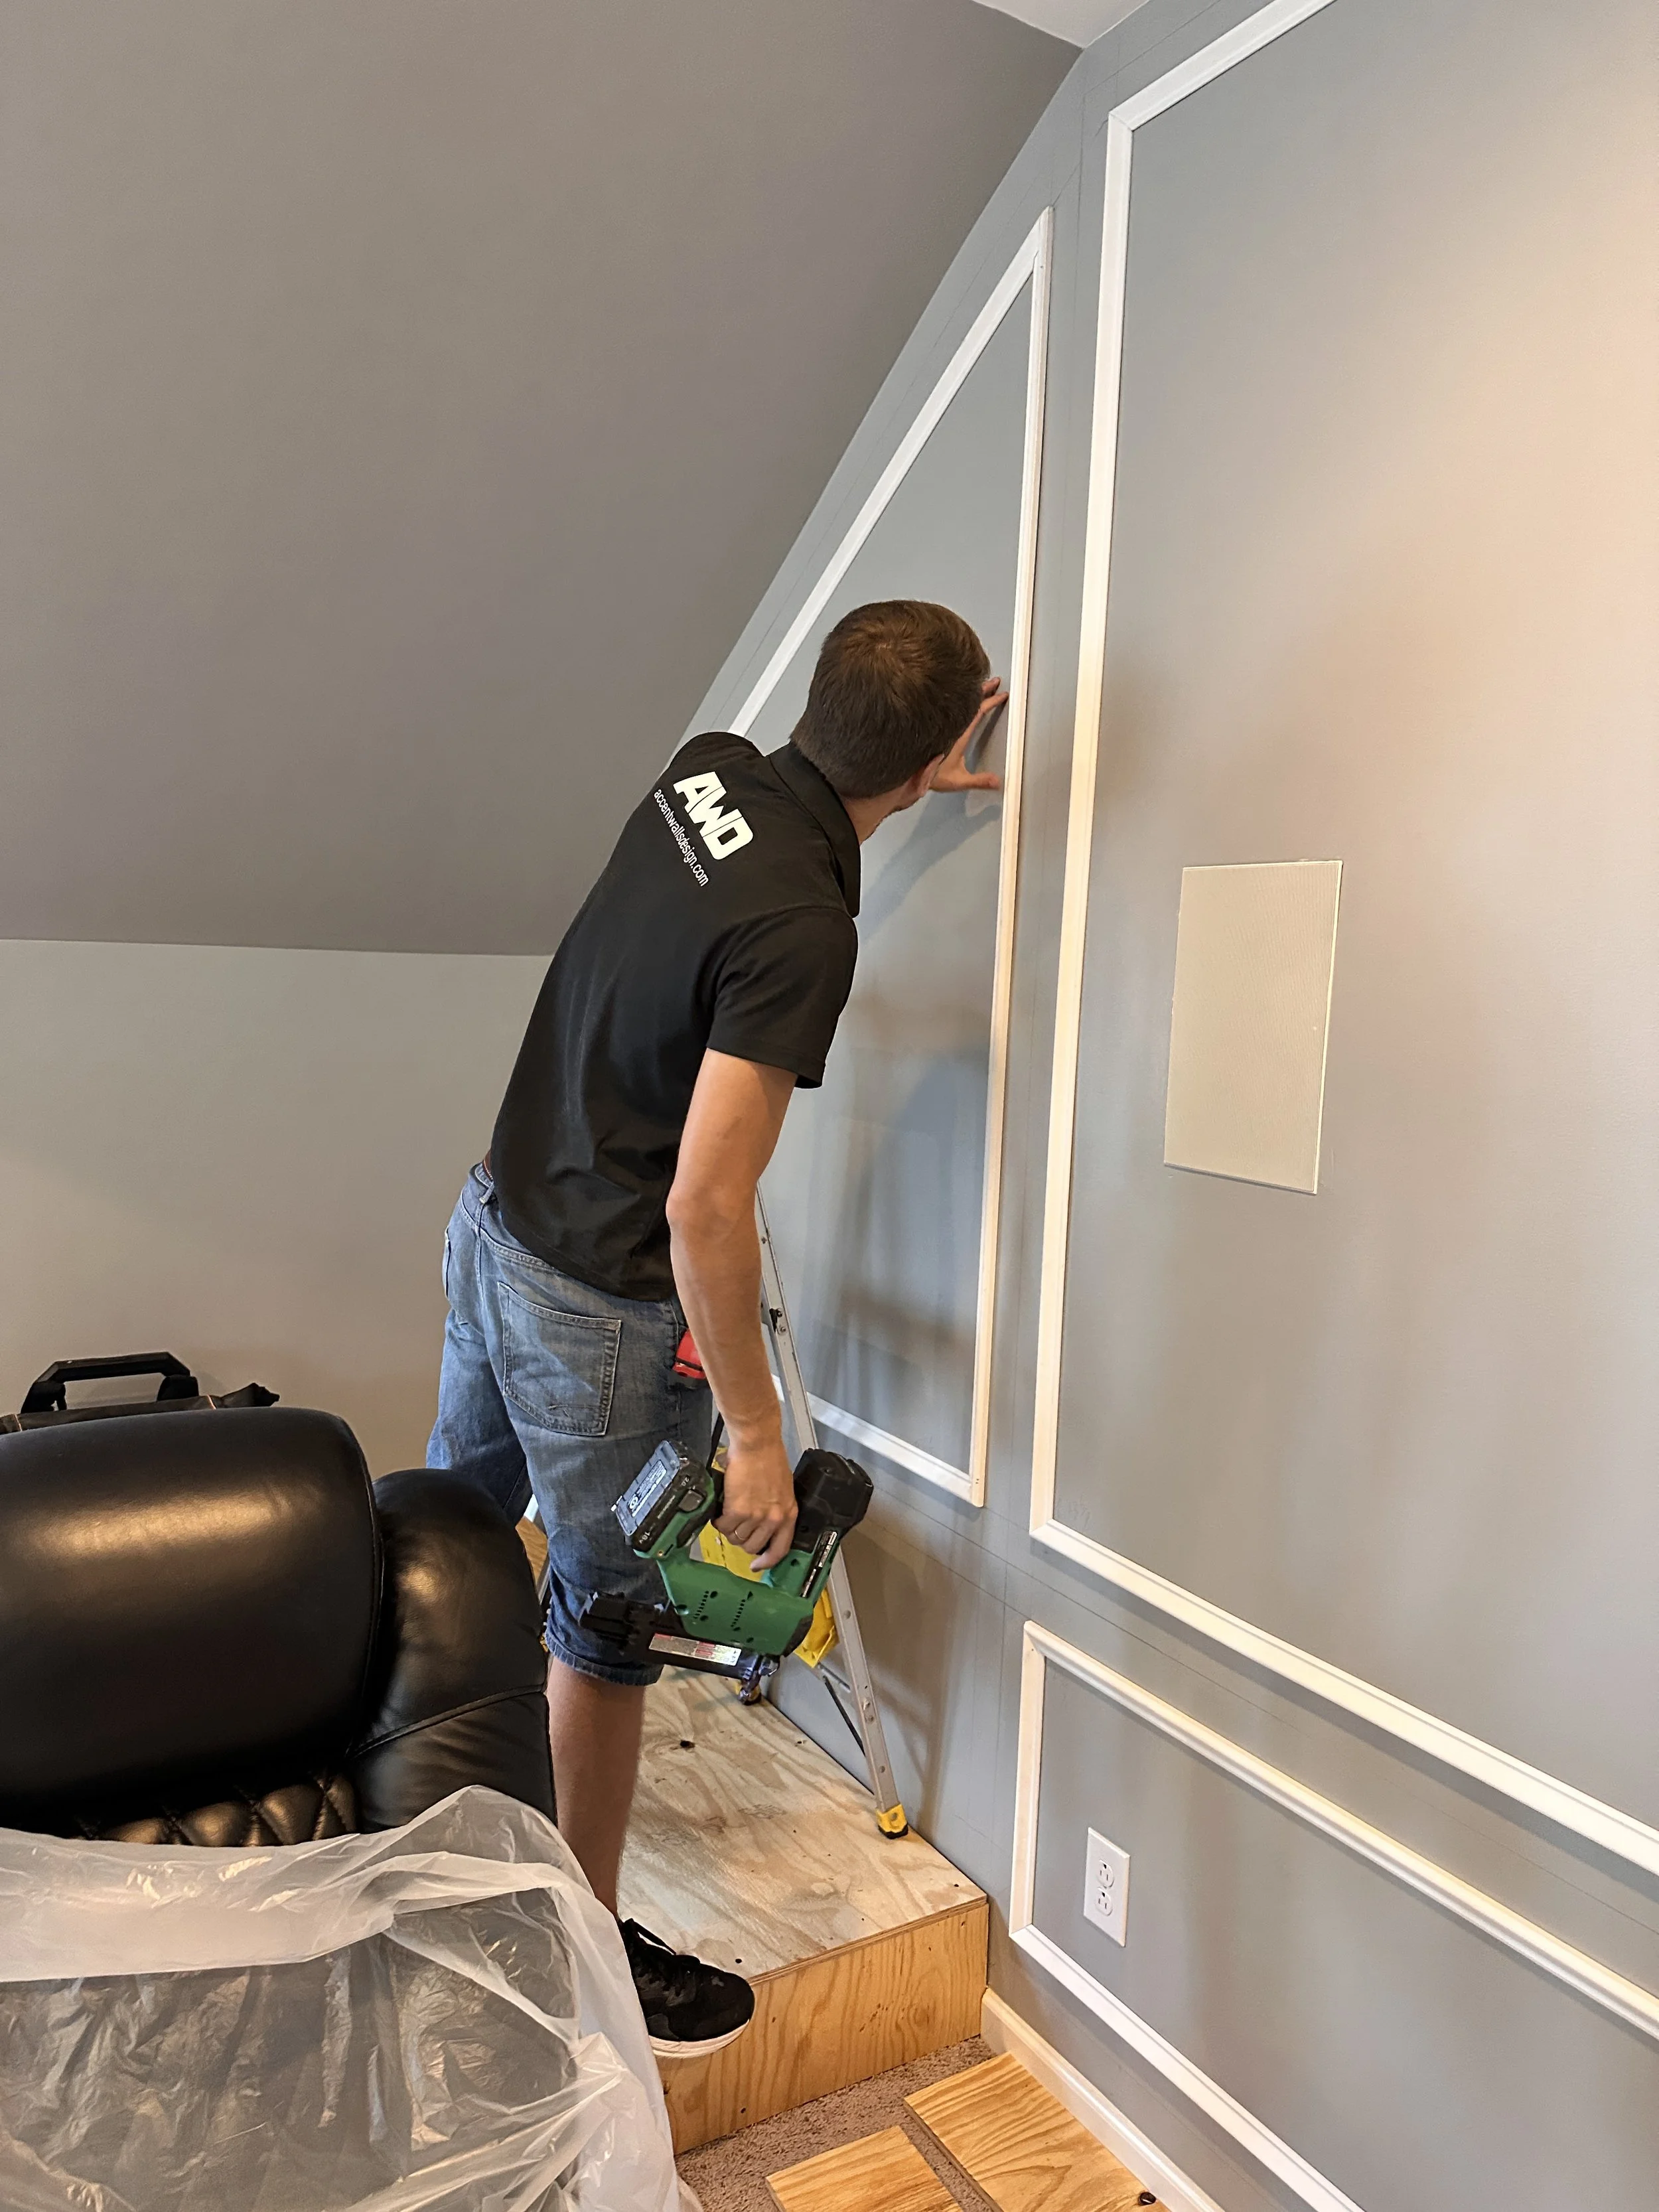
Structural Framing: MDF + Wood for Strength and Smoothness
The Media Wall structure mixes MDF and kiln-dried wood. MDF gives ultra-flat paintable faces; wood studs supply screw-holding power and long-term stability. We incorporated:
Cable chases and removable backs in alcoves.
Vent channels above the equipment bays for passive airflow.
Leveling cleats under the long bench so doors stay true over time.
Specialist’s comment: Paint-grade MDF is unbeatable for perfectly straight reveals. We seal all cut edges before paint to avoid fuzz and future swelling.
Power & Low-Voltage: Quiet, Labeled, and Future-Ready
We ran a dedicated 20A circuit for the rack and subwoofer, plus separate lines for lighting and the projector. Low-voltage conduits service the TV, screen trigger, and in-wall speaker runs. Everything is labeled on both ends. IR/radio remotes and a compact hub sit behind the glass doors for easy line-of-sight when needed.
Tip: Keep speaker and power cables crossing at 90° to minimize noise.
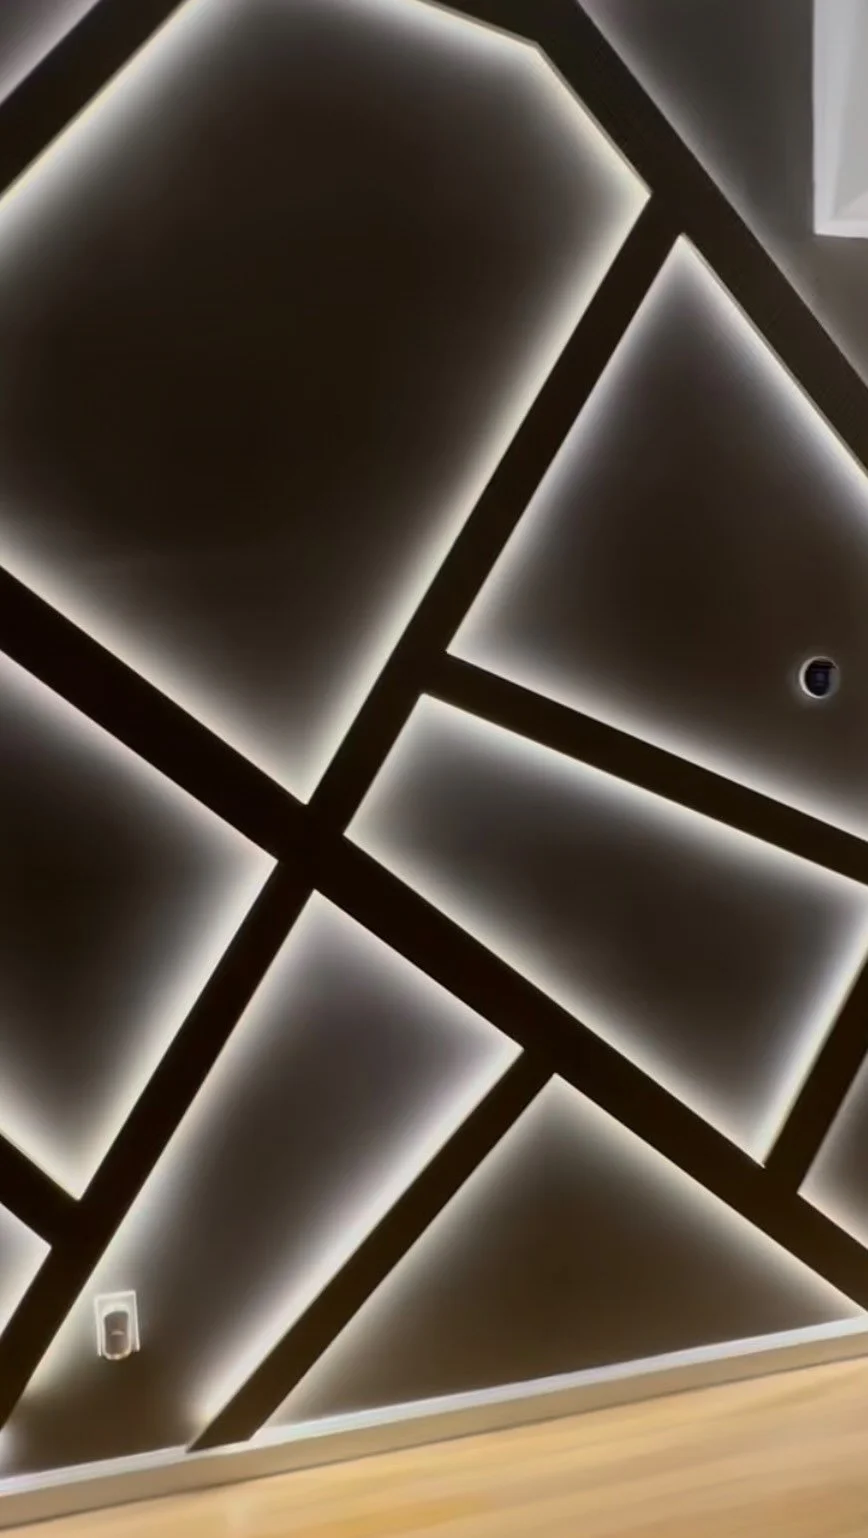
Smart Lighting: Wi-Fi RGB LED+ and Bias Light
Lighting is a feature, not an afterthought:
Wi-Fi RGB LED+ strips sit behind the TV for bias light and along the seating riser for safety.
Side alcoves have tiny downlights to showcase speakers and decor.
Scenes (Movie, Game, Clean-up, Nightlight) change brightness and color temperature in seconds.
Why bias light matters: A dim, neutral halo behind the screen eases eye strain and increases perceived contrast—especially in dark rooms.
Feature Sconces: Curved LED Accents that Float
Those sculptural S-curve sconces on the shiplap add softness to the geometry. We mounted them at eye level for glow without glare. Because they’re LED with diffusers, they throw even light that photographs beautifully and won’t distract during a film.
Shiplap & Wall Finish: Graphite “Total Black”
We installed horizontal shiplap and finished it in Graphite for a “total black” look. The tiny grooves subtly diffuse light, reducing harsh reflections across the front stage. The low-sheen finish hides speaker cutouts and blends the TV when the screen drops.
Specialist’s comment: Horizontal shiplap draws the eye wide, making the wall feel even larger and the room more cinematic.
Cabinetry & Doors: Sherwin-Williams Deep Blue
The built-ins are a mix of MDF and wood with perfectly straight, square profiles. We sprayed them in Sherwin-Williams Deep Blue for a rich, gallery-like tone. Center bays use glass fronts for remotes and IR while keeping dust away. Outer cubbies house a subwoofer and accessory equipment; another bay is sized for a small fridge/air unit as needed.
Finish stack: primer → sand → primer → sand → color coats → protective topcoat on high-touch areas.
Explore Sherwin-Williams color resources
Audio System: In-Wall Speakers and Subwoofer Bays
We set in-wall left/right speakers at ear height in the flanking columns. Subwoofer bays at floor level keep bass anchored to the screen and free the floor of clutter. Speaker wire runs are hidden and accessible. We added dense backer material behind speaker cutouts to reduce vibration.
Specialist’s comment: If you can, decouple subwoofers slightly from the cabinet floor with isolation pads to tighten bass and limit cabinet buzz.
Video System: TV + Motorized Projector Screen
There are two display modes:
Everyday TV on the wall-mounted 4K set with bias light.
Cinematic mode when the motorized screen drops silently in front of the TV. A ceiling projector locks onto the same centerline, so image geometry is perfect.
We tucked the screen housing into the upper reveal of the Media Wall. The result: clean lines, zero visual clutter, and a “wow” moment when it deploys.
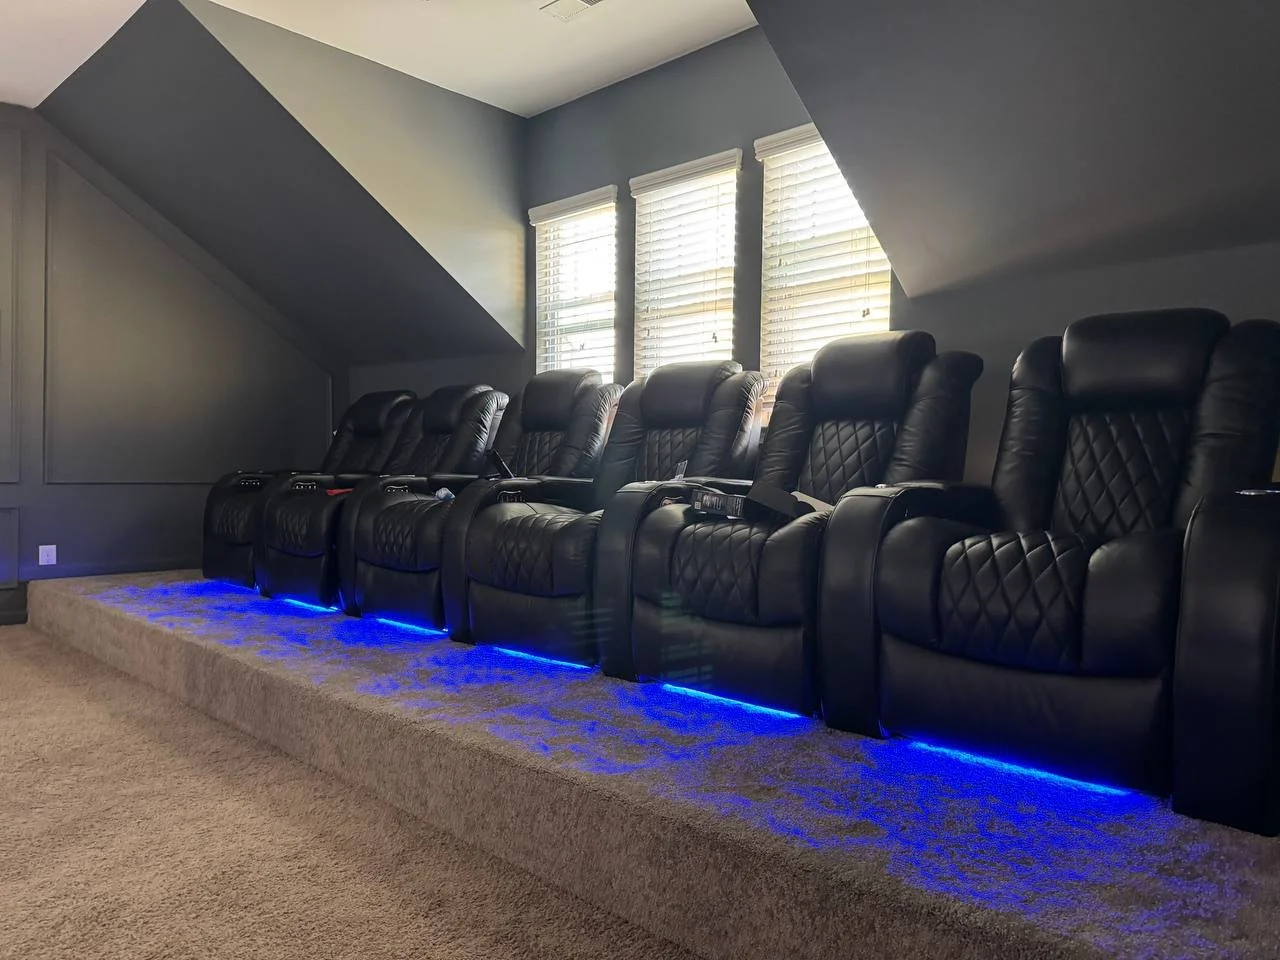
Seating Platform (Riser): Two Rows, Blue LED Step Glow
We built a full-width riser for the second row of leather recliners, wrapped it in carpet, and added blue LED step lighting under the lip. The height is calculated so Row 2 views clear the heads in Row 1. The soft carpet also cuts slap echo, tightening the soundstage.
Safety note: Low-level LED along the riser edge prevents trips without washing out the screen.
Trim & Gift Repaint: Details That Finish the Room
Beyond the front wall, we refreshed the whole space: new ceiling fixtures and recessed cans, a sparkling low-profile chandelier, and elegant wall moldings. As a gift to the client, we repainted the room so the color story flows: Graphite front wall, Deep Blue cabinetry, and coordinated grays on the side walls and doors. Everything now reads as one custom installation.
Controls & Automation: One-Tap Scenes
We tied the Wi-Fi LED+, projector trigger, screen motor, and select outlets to a single mobile app. Pre-set scenes do the heavy lifting:
Movie Night: Screen down, sconces 15%, bias light 20%, riser LEDs 5%.
Gaming: TV only, cooler LED tones, subs boosted.
Clean-Up: All lights 100%, equipment fans on.
Nightlight: Path lighting on the riser and alcoves.
Pro tip: Keep a physical wall keypad for guests—no one should dig through an app just to turn on lights.
Acoustic Touches Without Ugly Panels
We leaned on materials already in the design:
Thick carpet and plush seating absorb mid-to-high frequencies.
The shiplap grooves offer mild diffusion.
Speaker placements avoid perfect symmetry with room corners to smooth bass.
If the client later wants more treatment, the alcoves can hide discrete absorption without changing the look.

Safety & Serviceability
Vent slots behind gear bays for passive cooling (and optional whisper fans).
Removable back panels for upgrades.
Surge protection and a UPS on the projector.
Labeled cables everywhere. Future you will say thanks.
Media Wall Quick-Glance Table (Mobile-Friendly)
| Element | What We Did | Why It Matters |
|---|---|---|
| Front Media Wall | MDF + wood, Graphite shiplap, symmetrical alcoves | Clean lines, low reflections, easy service |
| Lighting | Wi-Fi RGB LED+, bias light, curved sconces | Mood control, eye comfort, photogenic glow |
| Cabinetry | Sherwin-Williams Deep Blue, glass center doors | Hides gear, IR-friendly, durable finish |
| Display | 4K TV + motorized drop-down screen | Everyday use + instant cinema |
| Audio | In-wall L/R, sub bays, isolation pads | Big sound with zero clutter |
| Seating | Two-row riser with carpet & LED edge | Perfect sightlines, safe steps |
| Controls | One-tap scenes in app + wall keypad | Easy for family & guests |
| Upgrades | New recessed lights & chandelier | Balanced layers of light |
💡 This compact 3-column layout stays readable on phones and scales beautifully on desktops and tablets.
Build Steps (17-Step Summary)
Discovery & measurements
Sightline and throw calculations
Framing the Media Wall with service cavities
Running power and low-voltage
Mounting the TV and pre-wiring the screen trigger
Installing shiplap; priming and sealing edges
Spraying Graphite total-black on the feature wall
Building/spraying cabinets in Sherwin-Williams Deep Blue
Hanging doors and fitting glass fronts
Fitting curved LED sconces and alcove downlights
Installing Wi-Fi RGB LED+ strips and bias lighting
Setting in-wall speakers and subwoofer bays
Ceiling mount for projector; aligning lens and screen
Building the carpet-wrapped riser with blue LED step lights
Updating recessed lights and chandelier
Gift repaint and decorative wall trim around the room
System calibration, scenes, and final photo clean-down

Specialist Q&A (FAQs)
Media Wall – Clickable FAQ
1) How wide should a Media Wall be for a room like this?
2) Why use shiplap behind a screen?
3) Do I need both a TV and a projector?
4) What’s the benefit of bias lighting behind the TV?
5) MDF vs. plywood for cabinetry—what’s better?
6) Will the blue LED step light ruin dark scenes?
7) How do you keep equipment cool inside cabinets?
8) Can I retrofit a motorized screen if a TV is already on the wall?
9) What paint sheen is best near screens?
10) How do you control everything easily for kids/guests?

Pro Tips From the Field
Label everything. It saves hours later.
Leave pull-strings in conduits for future cables.
Isolate subwoofers with pads to reduce rattles.
Use removable panels behind gear. Upgrades happen.
Test the screen drop many times before final paint.
Document your scenes so anyone can restore defaults.
For deeper reading on home theater ergonomics and lighting, this primer on bias lighting best practices is a helpful starting point.
Why This Media Wall Feels “Bespoke”
It isn’t only the tech. It’s the composition: the even spacing of alcoves, the curve of the sconces against horizontal shiplap, the way Deep Blue cabinetry grounds the wall, and the blue LED under the riser that mirrors the cool glow behind the TV. Add the gift repaint and wall trim, and the room looks designed—not improvised. That’s how a Media Wall becomes the heart of the home.
Mini Spec Sheet (Share With Your Contractor)
| Area | Spec Snapshot |
|---|---|
| Feature wall | Graphite total-black shiplap, low sheen |
| Cabinet finish | Sherwin-Williams Deep Blue, sprayed |
| Lighting | Wi-Fi RGB LED+ strips, curved LED sconces, alcove downlights |
| Displays | Wall-mounted 4K TV + motorized drop-down screen |
| Projection | Ceiling mount with aligned throw and trigger |
| Audio | In-wall L/R, subwoofer bays with isolation |
| Seating | Two-row riser, carpet wrapped, blue LED step light |
| Controls | App scenes + physical keypad |
| Extras | New recessed cans + chandelier, gift repaint, decorative trim |
Maintenance & Futureproofing
Keep firmware updates current on the screen, projector, and lighting hub.
Vacuum cabinet vents quarterly.
Leave one conduit empty for future HDMI/Fiber.
Save a pint of every paint color for touch-ups.
Conclusion
This build shows how thoughtful planning and craft can turn a regular room into a full-scale cinema with a commanding Media Wall. From the Graphite shiplap and Deep Blue cabinetry to the Wi-Fi RGB LED+ scenes, motorized screen, carpeted riser, and clean audio integration, the space looks stunning and performs even better. If you’re dreaming about a similar upgrade, use our tables, steps, and pro notes as your roadmap—and enjoy the show.